

If you’re feeling handy and ready for a good challenge, there are a few intricate steps to take when doing a toilet replacement. If it’s done correctly and utilizing the steps below, your toilet replacement can be done efficiently, with better flushing and most importantly, leak-free.
How To Replace Toilet
This How-To guide can help any homeowner looking to grab the bull by the horns and replace a toilet on their own. As with most things involving complex plumbing, give your local plumber a call if you ever run into any problems!
Step 1: Measure, measure, measure
The logical first step to purchasing a new toilet is to find out the rough-in area of the current toilet. You won’t want to purchase a replacement for an area that won’t fit your new toilet! Most toilet models are standard size, so you should be fine on measurements. The issue will arise more in regards to distancing from walls surrounding the toilet.
Standard toilets will be approximately 12 inches from the wall, with the starting point being the hold-down bolts. Some toilet models will be situated 10 or 14 inches from the wall, so be sure to measure that entire area. However, in regards to toilets as in with most appliances, be prepared to pay a little extra if you’re looking at a different size circumference around the unit.
With standard devices and appliances comes standard pricing. When the unit is sub-standard or off by a few inches, the pricing can become a little more expensive.
Step 2: Selecting Bolts and Parts
As with most plumbing jobs, resisting corrosion can be problematic and unavoidable. With water at the base of every job we do, selecting the right parts can go a long way to preserving your appliances, your floor and tiling as well as the structure and cabinets surrounding the unit.
We recommend using brass bolts to tighten the toilet in to ensure maximum support against water. Some bolts come with a yellowish zinc coating, so you’ll want to be sure that your bolts are actually brass. Some advantages to brass also include being able to cut them off later. Alternatively, if you need to re-anchor your toilet, we would recommend stainless steel screws. They won’t corrode as well and won’t break like brass.
Step 3: Cutting the old hold-down bolts
After years of being in one place and probably haven’t been moved in a long while, removing a unit can sometimes be cumbersome. The old nuts that are holding your toilet in place most likely won’t budge due to years of corrosion.
Be careful, but using a hacksaw blade is the ideal solution to unbolting those tight, old bolts. Purchasing a close quarters blade at your nearest hardware store is a great idea and will help you on your way to removing the old toilet.
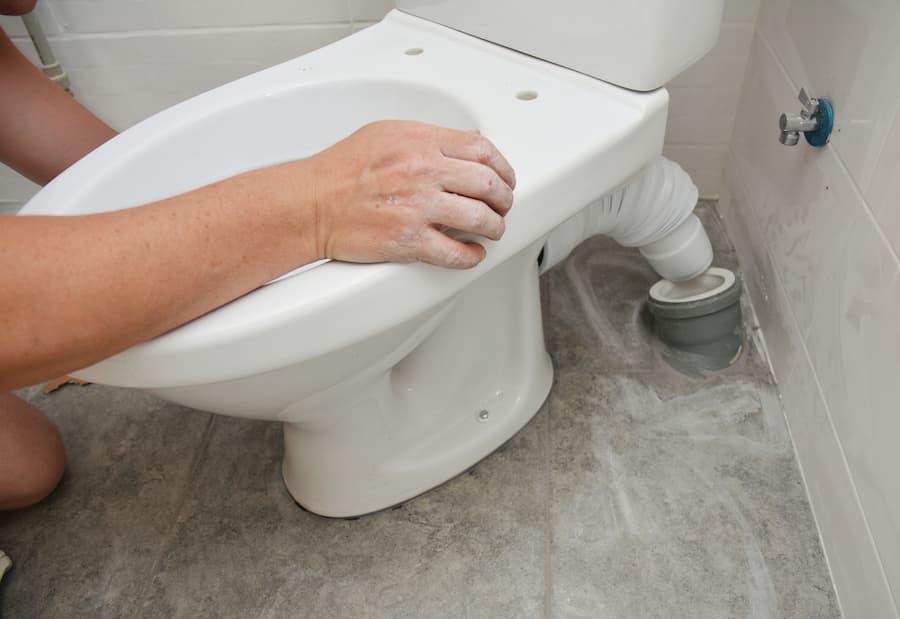
Step 4: Installing The Toilet
Being as agile as possible, setting your new toilet can be an arduous, meticulous process. Making sure you set the toilet perfectly and ensuring the bolts don’t slip and tip as you hold the toilet carefully above the bolts can be a painfully frustrating process.
You also don’t want to budge or move the all-important wax ring as you carefully move it over. The best solution is to get a second set of nuts and washers so you can lock the bolts in place before you set it. Once it’s in the correct position, lift it off and add the wax ring using masking tape.
Step 4: Ensuring no leaks
The best solution to a leak-free toilet replacement and installation is getting a solid toilet flange to help anchor the toilet to the floor. If the flange is loose or damaged in any way, the toilet will rock back and forth. And with a rocking toilet comes the snowball effect of distorting the wax ring and this can cause leaks.
Be sure to get rid of the old wax ring by scraping it off and carefully inspecting the flange.
Step 5: Eliminating Rocking Toilet
When the toilet is placed on a floor that’s uneven, the toilet can rock and will eventually break the wax ring seal. Be sure to check for wobbly floors after the new toilet has been set so you can offset the difference. The best way to eliminate a rocking toilet once the new one is in place on a wobbly floor is to place a shim or stainless steel washers underneath. Once the wobble is eliminated, tighten the nuts and cut out the shims so the toilet is even.
As with all the steps to the toilet installation process, give us a call if you run into any issues.
Step 6: Settling the Toilet in place
Once you’ve firmly placed the toilet over the wax ring, it’s important to “squish” it into place. The best way to do this is by sitting on the toilet and applying as much weight as you can to the toilet without breaking it. Be careful not to force the toilet down but gently press down so it fits over the ring and squeezes into place.

Step 7: Tighten Water Connections
Once the toilet is in place, it’s time to re-tighten the water connections. We recommend buying a flexible water supply line as it’s easier than installing a stiff metal mesh. The best way to seal it is to hold the hose so it aims right into the shutoff valve while you’re screwing in the connectors. Tighten them by hand at first and then use pliers to get it to an acceptable tightness. Be sure not to tighten it too much as it could cause leakage and we definitely don’t want that.
Final Step: Finishing Touches
For best measures, most new toilet bolts come equipped with extra-long bolts. This means that any remainder would have to be cut prior to use. The final steps include connecting the water line, flushing the toilet multiple times to ensure it’s in good working order and not leaking. Once all of that is complete, you can safely cut the bolts and remove any remaining residue that might’ve built up.
Congratulations! You’ve successfully installed a toilet on your own! At Preferred Plumbing Solutions, we are happy to provide any assistance with toilet replacement throughout any point in the process and will leave your home or business as tidy as it was when we got there.
FAQ
How long does a toilet last?
It totally depends on the mineral level in the water and the voliume of us. Some toilets will need servicing or replacing at the 5 year mark, some may last 20 years.
My toilet is making weird noises, should I be concerned?
Yes. That means the internal parts are failing and are no longer operating correctly, and you are losing water.